Showing posts with label reuse. Show all posts

Wednesday, August 20, 2014

Water Conservation

I've recently become aware that more people are concerned about the drought than I thought so I figured why not visit some easy water conservation techniques pretty much everyone can do. 

Let's start with the easiest, turning off running water. How much simpler than that can get it get, right. Now let's talk about running water and when you should be turning it off. In the bathroom, while you brush your teeth and even soap up your hands or face. In the kitchen, when rinsing fruit and veggies, they don't need running water, a small bowl of water will clean them just as well. If you feel you need running water to do these things do them over a bowl and collect that water to be used elsewhere. 

Using this collected water is also a lot easier than you think. My bathroom sink often has a small bowl in it and I wash my hands into it and use this water to water a potted tree on my patio. If you don't have any plants to water but need a way to use dirty water, flush your toilet with it. This is a lot simpler than you think, you don't need to open up the tank and do anything complicated, just pour water into the bowl. You might have to figure out the best amount of water to use for your toilet, a small bowl that fits in my bathroom sink isn't quite enough to get a good flush in my bowl so I use a bigger container I add to and can then use to flush. While we are on the subject of toilets, there is the old if it's yellow let it mellow, if it is brown flush it down. If you think this is gross please take a minute to remember that we purposefully take perfectly clean water and piss and shit in it, that's gross and wasteful, letting a little bit of watered down pee sit for a bit isn't that gross, toilets have lids and they are in a room that is dedicated to them. 

Other simple way to save a lot of water is catching your shower warm up water, I don't know about your shower but mine takes a bit to get to a temperature I am willing to stand under. Put a bucket under the faucet or shower head and collect the water while it gets up to the perfect temperature for you to shower in. This water is clean and can be used for pretty much anything you want. You can use it for soaking dishes, bring it to your kitchen sink and pour it in. While you are showering, be quick. I am awful at this one, but I shower once maybe twice a week so I guess if I take a 15 minute shower it isn't as bad as a daily 15 minute shower. Also think about turning the water off while soaping and shampooing, there are shower heads (you should be using a low flow shower head for optimal water saving) out there with shutoff valves on them. I have one that doesn't shut off the water completely but takes it down to a trickle, which can be collected as well, so the temperature of the water doesn't drop when you turn it back on, no one likes a sudden shot of cold water. 

When it comes to washing clothes and dishes, always ALWAYS run full loads in a washing machine, it's just a waste to do otherwise. If you are a homeowner, don't have a real grass lawn, just don't, it's not worth it. If you really want one or you must then water it at night and don't water it too often and find a kind of grass that works best for your area. Make sure your sprinklers aren't watering sidewalks and driveways. If you live in a complex, voice any concerns about the way they water, if you notice a lot of runoff or sprinklers watering sidewalks or driving/parking areas, let management know. Same goes for any shopping or public area you frequent and notice these things, let management companies know about any leaks or water wasting you see from their property, they pay for all this water, they don't want to just waste money. 

In the kitchen, if you are a coffee or tea drinker, only make enough hot water or coffee as you are actually going to drink. If you make a lot of pasta or steam a lot of foods use this water for plants or even in soups or other food you're making, it can add a bit of extra flavor. If you are really serious about trying to reduce you water footprint I suggest you do a little research of your own on how much water goes into the production of your food. Yes you need to eat but do you need to eat that much red meat or that much chocolate (YES, YES I DO!), both have very high water footprints. 

There is one thing I don't think you need to worry about, doing the ice bucket challenge for ALS. If you want to do the challenge but feel guilty about the water, use shower warm up water, it's more than enough to make some ice with and then dump on yourself. Or just DONATE, but that isn't as fun and isn't spreading the word as much because let's be honest seeing someone freak out when they get soaked with ice water is a lot more fun than seeing a picture of a donation receipt and there is no way that is ever going to go viral the way this challenge has. I think the benefit of something like this way out weighs the waste of water and I am pretty sure anyone who has or knows someone who has ALS greatly appreciates the viralness of this phenomenon. (Did I just trick you into reading a post about something when it was really about something else, yes, yes I did)

Sunday, October 7, 2012

Craft, crafty, crating

I haven't been blogging with much, uh, frequency but I haven't stopped doing blog worthy crafty things. Here are some pictures of things I have made/done.


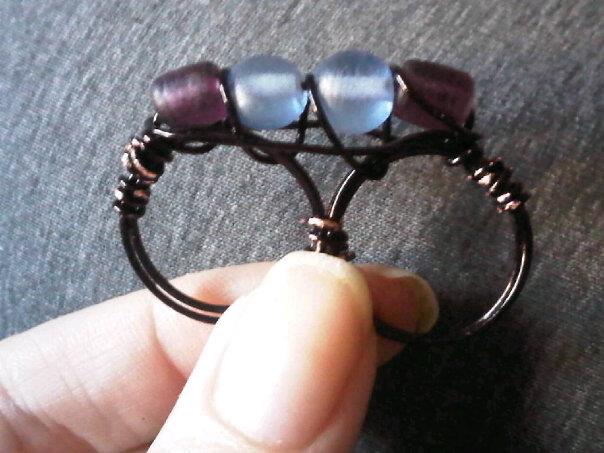
My fairly successful attempt at ring making. I should probably buy myself some jewelry making pliers because using my old rusty needle nose pliers resulted in my scraping off the black on the wire and revealing the copper color, which doesn't look awful but isn't what I was going for. I also need a ring thing.....you know the cone thing that you can wrap the wire around to get the right size, because I used chapstick tubes for this and the sizing is pretty awful. 


Simple chain earrings. Wore these all day when my mom got married but they are slightly heavy, after this day I took off 2 of the chains (went from 5 strands to 3) and they look just as good and pull less on my ears.  


I love Halloween time and the fabrics that show up. Bought myself this lovely black and silver spider print and made myself a new small purse. Lined it with a lovely purple and gold print and put a decorative skull button on the front. All it took for this bag was 2 fat quarters and it was rather simple to sew together. 

 Another simple funky looking necklace. I added a few more safety pins to the lowest chain (had to buy more). Saw this over at Trinkets in Bloom, she has some great things on her blog.

Don't think I posted this already but I may have. This was a lunch bag I made for my mom for her birthday I think. She had asked me to make her one. 

With the extra material I made a headband. 

Skirts! Making skirts is fun and pretty easy!  

I wore the red one to my moms wedding and the day walking around Balboa Park.

This one is sheer and I used an old tshirt of my husbands as a lining. 
(Me and my mom!)


Snake skin print is channeling my inner 80's personality!

From skirt making I moved onto dress making. This one took a few days and I love the way it turned out. These are some pretty crappy pictures of it, the flow and pattern are much nicer in person. 


 A few bracelets I made. 

 I took an old pair of heels that had stretched  a bit and I couldn't really wear anymore, painted the heels silver and added sliver laces too. 

Look at what I finally did, chalkboard paint and storage jars! My cabinet is still full of re-purposed jars but now they have chalkboard paint labels! Woohoo! It only took me years to accomplish this!


That's pretty much how I have been occupying my time this year. I am currently working on ideas for Halloween or Christmas cards, thinking I might skip Halloween cards this year but not sure. I enjoy Halloween much more than Christmas but I think people want/expect Christmas cards from me more than Halloween. Don't have any great ideas for either at this point. Need some inspiration. 
Anyone have any cool/fun things they have done or are planning on doing?

Tuesday, January 17, 2012

I've been de-cluttering, organizing, and of course cleaning as I go. I've completed the bedroom (but not the master bath yet, point a marital contention, it'll get done eventually, I think). I will post what I've done there at some point, don't have any before pictures, it's too hard to take before pictures. I am currently working on the bulk of the apartment, the living/dining areas. The hardest part is the de-cluttering, I am a bit of a pack rat. So much stuff. In the process I've been making things, like the can I made last night, see previous post. Today I made a charger corral of sorts.


It is made from the cardboard of a Tofuky pack of Italian sausages, which are really tasty by the way. I opened it up on it's seam and glued it back together backwards, so all the product stuff was on the inside and it was plain cardboard on the outside. To make it more decorative I took a picture from an old calendar and glued it to the outside.

This is also something that can be done with toilet paper rolls. I made one like that years ago for my husbands head phones. I used an add for some beach get-a-way or something like that if memory serves. It's just a pretty serene picture.

Monday, January 16, 2012

Make it Monday

Started with this


And end with this

 Super simple and can be used for all sorts of things. This was originally a can of coconut milk and is now a pen holder. 

Monday, November 7, 2011

Last Halloween post featuring my Halloween cards

I sent out Halloween cards, because as I've said before, it is my favorite holiday, oh and they were hand made cards. I got creative, something I love doing but have problems doing because I have no drawing/painting ability so I am limited. 


I used packing paper. My husband got a box of drinks from Hubert's Lemonade and this brown paper was what they were packed with. Perfect for what I was doing.

Not only did I make cards but I made envelopes as well. For the envelopes I used paper grocery bags. For a template I used a little card/envelope I had lying around. 


I actually had to ask my brother for a few grocery bags and got lucky with the packing paper. Before the packing paper surprisingly appeared I was kinda in a panic of what I would use. I didn't want to go out and buy something, I really wanted to reuse something. 


The hardest part in the process was keeping the paper from my cats.  We use cloth grocery bags and when we do get paper bags or any kind in general it goes on the floor for the cats to play with. They did not get why they didn't get to play and chew and tear this paper apart.


 Here are the cards and envelopes once they were finished. 


I ran out of ribbon so I wasn't able to make as many cards as I wanted and I wasn't about to mar the nice look of the front of the cards with my icky hand writing, it just wouldn't have looked as good.

One last time. Don't forget to enter for a chance to win one of my hand made fabric pumpkins. They'd make a great addition to Thanksgiving decoration. I'm picking a winner tomorrow (November 8th) at 2pm PST (or  sometime around then). GIVEAWAY  (click it!!)

Monday, June 13, 2011

DIY fruit fly trap

It's summer, or suppose to be summer let's not talk about that, either way fruit flies have arrived. I always have problems with fruit flies. The easiest way to get rid of fruit flies is to not attract them in the first place. Keeping your kitchen clean, washing dishes right away, eating fruits and veggies quickly or storing them in the fridge, but really who does that. Things get left out, things get forgotten, fruit flies find their way into your home, it happens. It happens to me a lot because I have a compost pail that apparently lets flies in to it. I may also let dishes pile up and lose a apple, lemon, or lime on the back of my counter on occasion. Basically I don't have a spotless kitchen.

I do however have a really simple and basically free way of dealing with the fruit flies. I make fruit fly traps from things I already have lying around my kitchen. I have 3 traps in my home, 2 in the kitchen and one in my animal room, because animals attract flies too. I have 2 made out of 2-liter soda bottles. It's quite simple to make, take your bottle, you can even use a smaller 12-ounce size, or whatever plastic bottle you have on hand. Cut the bottle top off somewhere between a quarter and a third of the way down. It depends on the shape of your bottle, you will cut the top part off and invert it into the base you have left. You want it to not fall all the way in but you want it to be short enough to put liquid in the bottom of it to attract and then drown the flies.

Here are my traps made from 2-liter bottles. One I've had for a few years and one I made more recently.

The flies will fly into the bottle but not be able to find their way back out. As a lure for the flies put a some apple cider vinegar in the bottom, enough for them to drown in once then get in there. At first I put in a squirt of liquid soap as well to make it easier for them to drown but I've found that not necessary. The traps are easily refreshed by dumping out the dead fly vinegar and adding more. I've also found wine and soy sauce work as attractants as well but those need to be changed more often because they seem to grow mold more readily than the apple cider vinegar.

If you like Starbucks frappacinos you can make a no cut fly trap EXTREMELY easily, or any other sort of drink cup with a dome lid. Just clean the cup after you've enjoyed your drink invert the lid in the cup and a fly trap has been made.
The hole for the flies to get in is a bit bigger than a 2-liter but I this did not seem to be an issue with them finding their way out. There was a good amount of drowned flies in the apple cider vinegar. Can you see them all in there? Trust me they are in there.
Simple, cost effective, reuse, and effective at their job. Does it get better than that, oh yeah no more fruit flies everywhere!!


Sunday, May 16, 2010

Bottle cap magnets

You could do this the easy way like Condo Blues did. With the right pieces and it would be simple and fast. Or you can do it my way and use up some things you have lying around the house and take a bit more time.

The things lying around the house you'll need to have, bottle caps of course, free business card magnets (or any magnets you may have lying around and no longer need/want), and scraps of fabric or even paper/cardboard, perhaps from junk mail if you don't have scrap fabric. I used fabric because I have A LOT of it and no real use for it but I can't just throw it out, think there are some under lying issues there.

Gather all your supplies: desired bottle caps, magnets, scrap fabric, and hot glue gun:


Measure out a piece of fabric that fits inside the bottle cap width wise, fold it up so it all fits in the bottle cap with some space left for the magnet piece and glue it in. Make sure you glue at most/all folds.


Measure and cut your magnets into pieces that will fit in your bottle cap. I choose to go with rectangles versus circles cause they were easier to cut to a correct size for me.
Glue your magnet to your fabric
Stick on your fridge or whatever surface you please.


Saturday, February 13, 2010

Old jacket new necklace

I saw a great leather chain necklace tutorial on craftzine.com's blog.Which is originally fromcucumbersome.com which is a great blog that I am glad I found. Here is a cucumbersome's tutorial.

I then remembered the jacket I got probably 10+ years ago that while it is a nice leather jacket the color is way too much for a whole jacket, I think I wore it a grand total of 3 times. Seriously, what was I thinking, sometimes I really do need someone with me when I buy things.


So I took apart the jacket and using the large back panel I followed the steps in the tutorial and made myself a necklace of my own. I used a much smaller scale of the template because I wanted smaller pieces and I made mine much shorter than the original.


Added bonus for me is it matches my mermaid tattoo on my left upper arm. A total coincidence, I got the jacket WAY before I got the tattoo and I didn't choose the specific color for the tattoo. The original art is blue and the tattoo artist decided on the exact color to use on my tattoo based on my skin tone and all that good stuff. He is a good artist, a very good artist. It is actually the only tattoo I have out of 6 that has color because I am a bit concerned about clothes not matching my tattoo. My mom has a color tattoo on her arm and certain colors clash pretty badly with hers. I didn't even notice it matched until I finished the necklace and looked in the mirror.


I have 8 leather pieces left already cut out and a lot more jacket to work with, although they are all small strips/pieces, will probably make a bracelet the same way and see what else I can find to with left over leather pieces.

Tuesday, December 29, 2009

My mostly handmade Christmas

Note: If you happen to be reading this Mom, stop until we have exchanged gifts, you'll spoil the surprise!

My Christmas was mostly homemade, on my part at least. My brother, M-I-L and her twin sister came over Christmas morning for pancakes. I decided I wanted to display my holiday cards, didn't get many, mostly because I stopped sending them out to everyone because I just couldn't justify the paper use. I had some rope which I believe is jute, I cut a piece to a good size tied a knot on each end put a thumbtack inside the knot and hung or clipped cards onto the rope. Instant holiday card display.
I made some gift tags to go along with the pretty boxes I made from tea boxes. There was a box that had an add/coupon on the inside and one that I ripped too much for it to be considered pretty. I took parts of those boxes and glued the pieces to another piece of cardboard and made pretty matching tags.
I used the boxes for cookie, mmmmmmm cookies. I made Sandtarts for everyone, my favorite holiday cookie. A bit of foil and a stack of Sandtarts who wouldn't want those.

I made boxes for my Mom to take on her flight to Seattle tied with some hemp twine and my gift tags.

I put the boxes in a paper bag and found some Christmas stamps in my desk drawer and had some fun.
I used this same principle to wrap a calender and cd for Rich's Aunt. Cut up a paper bag for wrapping paper and used my Christmas stamps to decorate.

For my M-I-L and my husbands Grandma we got them a framed picture of the two of us and I added a card I decorated with stamps all tied together with hemp twine and a gift tag.
My mom got a framed picture too, an eye pillow I made, and a bookmark I made (more about those in a bit), wrapped in a t-shirt we bought her.
I bought my husband a new pair of headphones he desperately needed and quickly sewed a bag to put them in and added some tissue paper we had lying around.
Here are my cloth bookmarks I made. I used an old pair of jeans, cut off one of the legs, cut that into strips, sewed along the edges so they wouldn't completely fray and added a cute charm on the top. Quite easy and very useful and everyone seemed to really like them.


I also made a few lavender eye pillows from scraps I had lying around, I took my Mom's sewing machine earlier this year and never did anything with it and recently started teaching myself to sew, the bookmarks were one of my first attempts at doing something. I then found a box of scraps, a lot I recognized from Halloween costumes or pillows we had on the couch as kids. With some of the scraps I made lavender eye pillows. They are filled with flax seeds and dried lavender flowers, they smell delicious and are oh so relaxing.

For the people that I gave a bookmark and a eye pillow to I wrapped them together with hemp twine. They go together so well, don't you think.


One of Rich's other Aunt's got a framed photo (that I think has probably had mustaches and other things added to it already by Rich's uncle, hehe) and an eye pillow and I wrapped those two things together.

Everything is so simple yet still festive and pretty.